CoppeliaSim <<
Previous Next >> line following bubblerob
Simulation
Simulation
模擬
A simulation in CoppeliaSim can be started, paused and stopped with [Menu bar --> Simulation --> Start/Pause/Stop simulation] or through the related toolbar buttons:
可以使用[菜單欄->模擬->開始/暫停/停止模擬]或通過相關的工具欄按鈕來啟動,暫停和停止CoppeliaSim中的模擬:

[Simulation start/pause/stop toolbar buttons]
[模擬開始/暫停/停止工具欄按鈕]
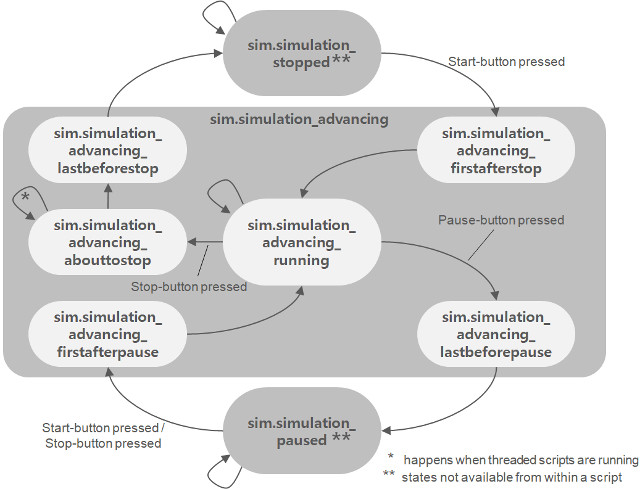
Internally, the simulator will use additional intermediate states in order to correctly inform scripts or programs about what will happen next. Following state diagram illustrates the simulator's internal states:
在模擬內,模擬器將使用其他中間狀態,以正確告知腳本或程序接下來將發生的情況。以下狀態圖說明了模擬器的內部狀態:
[Simulation state diagram]
[模擬狀態圖]
Scripts and programs should alwaysreact according to the current system call function and possibly the simulation state in order to behave correctly. It is good practice to divide each control code into at least 4 system call functions (e.g. for non-threaded child scripts):
腳本和程序應始終根據當前系統調用功能以及可能的模擬狀態進行反應,以便正確運行。優良作法是將每個控制代碼至少分為4個系統調用函數(例如,用於非線程子腳本):
1.Initialization function: sysCall_init: the function is called only when the script is initialized.
2.Actuation function: sysCall_actuation: the function is called when actuation should happen.
3.Sensing function: sysCall_sensing: this function is called when sensing should happen.
4.Clean-up function: sysCall_cleanup: the function is called just before the script is de-initialized (e.g. at simulation end, or when the script is destroyed)
1.Initialization函數:sysCall_init:僅在腳本初始化時調用該函數。
2.actuation函數:sysCall_actuation:應在發生actuation時調用該函數。
3.Sensing函數:sysCall_sensing:當應該進行檢測時調用此函數。
4.Clean-up函數:sysCall_cleanup:該函數在腳本未初始化之前被調用(例如在模擬結束時或腳本被銷毀時)
For examples on how to arrange a typical script, refer to the main script, the child scripts and customization scripts pages.
有關如何安排典型腳本的示例,請參閱主腳本,子腳本和自定義腳本頁面。
The simulator operates by advancing the simulation time at constant time steps. Following figure illustrates the main simulation loop
模擬器通過以恆定的時間步長推進模擬時間來進行操作。下圖說明了主要的模擬循環
Simulation loop
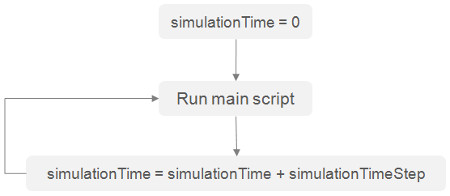
[Main simulation loop]
[主要模擬路徑參考圖]
Real-time simulation is supported by trying to keep the simulation time synchronized with the real time:
通過嘗試使模擬時間與實時保持同步來支持實時模擬:
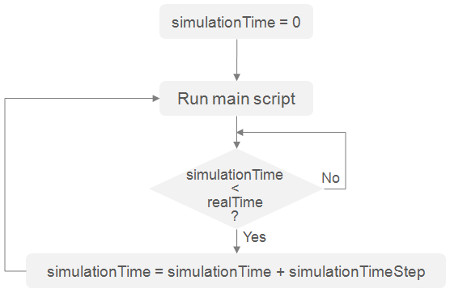
[Real-time simulation loop]
[加入真實時間後的模擬參考圖]
Following represents a very simplified main client application (messaging, plugin handling and other details have been omitted for clarity purpose):
以下是一個非常簡單的主客戶端應用程序(為清晰起見,已省略了消息,插件處理和其他詳細信息):
void initializationCallback
{
// do some initialization here
}
void loopCallback
{
if ( (simGetSimulationState()&sim_simulation_advancing)!=0 )
{
if ( (simGetRealTimeSimulation()!=1)||(simIsRealTimeSimulationStepNeeded()==1) )
{
if ((simHandleMainScript()&sim_script_main_script_not_called)==0)
simAdvanceSimulationByOneStep();
}
}
}
void deinitializationCallback
{
// do some clean-up here
}
Depending on the simulation complexity, performance of the computer and simulation settings, real-time simulation might not always be possible.
取決於模擬的複雜性,電腦的性能和模擬設置,實時模擬並不總是完美的。
In non real-time simulations, the simulation speed (i.e. the perceived speed) is mainly dependent on two factors: the simulation time step and the number of simulation passes for one rendering pass (see the simulation dialog for more details). In the case of a real-time simulation, the simulation speed mainly depends on the real-time multiplication coefficient, but also to a certain degree of the simulation time step (a too small simulation time step might not be compatible with the real-time character of a simulation because of the limited calculation power of the computer). During simulation, the simulation speed can be adjusted with following toolbar buttons
在非實時模擬中,模擬速度(即感知速度)主要取決於兩個因素:模擬時間步長和一個渲染通道的模擬通道數量(有關更多詳細信息,請參見模擬對話框)。在實時模擬的情況下,模擬速度主要取決於實時乘法係數,而且在一定程度上取決於模擬時間步長(太小的模擬時間步長可能與實時時間不兼容)。由於計算機的計算能力有限,因此無法進行模擬。在模擬過程中,可以通過以下工具欄按鈕來調節模擬速度
Simulation speed

[Simulation speed adjustment toolbar buttons]
The simulation speed is adjusted in a way so that the initial simulation time step is never increased (because this might have as consequence the breaking of a mechanism for example). Following two figures illustrate the simulation speed adjustment mechanisms
以某種方式調整模擬速度,以使初始模擬時間的步長永遠不會增加(這可能因此而導致機制中斷)。下兩個圖說明了模擬速度調節機制
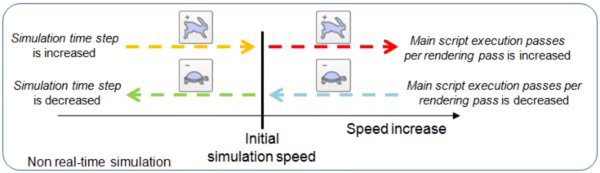
[Simulation speed adjustment mechanism for non real-time simulations]
[非實時模擬的模擬速度調整機制]
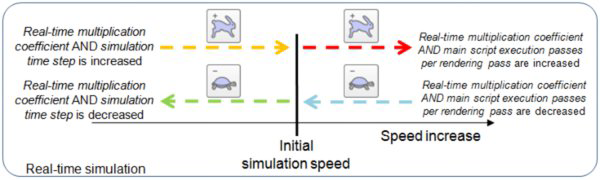
[Simulation speed adjustment mechanism for real-time simulations]
[實時模擬與調整機制]
By default, each simulation cycle is composed by following sequential operations:
1.Executing the main script
2.Rendering the scen
默認情況下,每個模擬週期由以下順序操作組成:
1.執行主腳本
2.渲染場景
Threaded rendering
The rendering operation will always increase the simulation cycle duration, thus also slowing down simulation speed. The number of main script executions per scene rendering can be defined (see further up), but this is not enough in some situations, because rendering will still slow down every xth simulation cycle (which can be handicapping with real-time requirements). For those situations, a threaded rendering mode can be activated via the user settings, or via the following toolbar button:
When the threaded rendering mode is activated, a simulation cycle will only consist in execution of the main script, thus simulations will run at maximum speed. Rendering will happen via a different thread, and not slow down the simulation task. The drawbacks have however to be considered. When threaded rendering is activated, then:

[Threaded rendering toolbar button]
Rendering will happen asynchronously to the simulation loop, and visual glitches might appear
The video recorder will not operate at constant speed (some frames might get skipped)
The stability of the application might be reduced
Some operations (e.g. erasing an object, etc.) require to wait for the rendering thread to finish work, before being able to execute, and vice-versa. In those situations, cycles could take more time than in the sequential rendering mode
交互渲染
渲染操作將始終增加模擬週期的持續時間,從而也降低了模擬速度。可以定義每個場景渲染的主腳本執行次數(請參閱後面的內容),但這在某些情況下還不夠,因為渲染仍然會減慢每個第x個模擬週期的時間(這可能會限制實時性)。在這種情況下,可以通過用戶設置或以下工具欄按鈕激活線程渲染模式:
[線程渲染工具欄按鈕]
激活線程渲染模式後,模擬週期將僅包含在執行主腳本中,因此模擬將以最大速度運行。渲染將通過不同的線程進行,並且不會減慢模擬任務的速度。然而,必須考慮缺點。激活線程渲染後,:
渲染將與模擬循環不會同步進行,並且可能會出現視覺上的瑕疵
錄影機將無法以恆定速度運行(可能會跳過某些幀數)
應用程序的穩定性可能會降低
某些操作(例如去除物件等)需要等待渲染得線程完成工作才能執行,反之亦然。在那些情況下,循環可能比有順序的渲染模式花費更多的時間。
Simulation dialog
模擬控制視窗
The simulation dialog can be accessed with [Menu bar --> Simulation --> Simulation settings] or by clicking following toolbar button:
可以通過[菜單欄->模擬->模擬設置]或單擊以下工具欄按鈕來訪問模擬對話框:
[Simulation toolbar button]
[模擬工具欄按鈕]
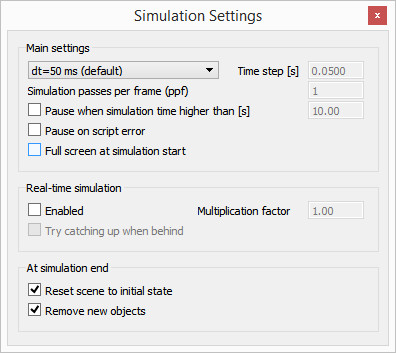
[Simulation settings dialog]
模擬設定視窗
Time step: the simulation time step. Each time the main script was executed, the simulation time is incremented by the simulation time step. Using large time steps results in fast but inaccurate/unstable simulations. Small time steps on the other hand will (generally) lead to more precise simulations, but will take more time. It is highly recommended to keep a default time step.
Simulation passes per frame (ppf): the number of simulation passes for one rendering pass. A value of 10 would mean that the main script is executed 10 times (10 simulation steps) before the screen is refreshed. If you have a slow graphic card, you can choose to display only one frame out of two for instance.
Pause when simulation time higher than: allows specifying a simulation time at which the simulation will be paused (e.g. to be able to analyze some results at a specific simulation time).
Pause on script error: if enabled, then a simulation will be paused when a script error occurs.
時間步長:模擬時間步長。每次執行主腳本時,模擬時間都會增加模擬時間的步長。使用較大的時間步長會導致快速但不准確/不穩定的模擬。另一方面,較小的時間步長(通常)會有更精確的模擬,但是會花費更多時間。強烈建議保留默認的時間步長。
每幀模擬次數(ppf):一個渲染遍的模擬次數。其值為10表示刷新屏幕之前,主腳本已執行10次(10個模擬步驟)。如果您的顯示卡較慢,則可以選擇僅顯示兩幅中的一幅。
當模擬時間高於以下時間時則會暫停:允許指定暫停模擬的模擬時間(例如,能夠在特定模擬時間分析某些結果)。
腳本錯誤暫停:如果啟用,則在腳本錯誤發生時暫停模擬。
Full screen at simulation start: if enabled, then simulation starts in full screen mode. Be aware that in full screen mode, dialogs and messages won't appear or won't be visible, and only the left mouse button will be active. For that reason that mode is only recommended once a scene is properly configured and final. Full screen mode can be left with the esc-key, and toggled via the boolean parameter sim_booparam_fullscreen during simulation. Unler Linux and MacOS the full-screen mode might only partially be supported, and switching back to normal mode might fail on certain systems.
模擬開始時全屏:如果啟用,則模擬以全屏模式開始。請注意,在全屏模式下,設置視窗和消息將不會出現或不可見,只有鼠標左鍵處於活動狀態時才會出現。因此,僅在正確配置場景並最終確定場景後才建議使用該模式。可以使用esc鍵保留全屏模式,並在模擬過程中通過布爾參數sim_booparam_fullscreen進行切換。 Unler Linux和MacOS可能僅部分支持全屏模式,並且在某些系統上切換回普通模式可能會失敗。
Real-time simulation, multiplication factor: if selected, then the simulation time will try to follow the real-time. A multiplication factor of X would try to run a simulation X times faster than real-time.
實際時間的模擬,倍增係數:如果選擇,則模擬時間將嘗試跟隨實際時間。 X的乘數將使模擬運行比實時快X倍。
Try catching up when behind: during real-time simulation, it can happen that the simulation time is not able to follow the real-time (e.g. because of some momentarily heavy calculations). In that case, if this check-box is selected, then the simulation time will try catching up the lost time (e.g. when the calculation load is again reduced), which results in an apparent speed-up.
在落後時嘗試趕上:在實時模擬過程中,模擬時間可能無法實時跟踪(例如,由於某些瞬間繁重的計算)。在這種情況下,如果選中此複選框,則模擬時間將嘗試趕上不足的時間(例如,當計算負載再次減少時),從而明顯加快速度。
Reset scene to initial state: when selected, then all objects will be reset to their initial state: this includes the object local position, local orientation and its parent (as long as the object wasn't modified otherwise (e.g. scaled)), joint and path intrinsic positions, floating view positions and sizes, etc. This means that the next simulation run will execute in a same way as previous one, unless heavy changes were undertaken (shape scaling, object removal, etc.). Some minor settings are ignored by this item.
將場景重置為初始狀態:選中後,所有物件都將重置為其初始狀態:包括對象的局部位置,局部方向及其父對象(只要未進行其他修改(例如,縮放),以及路徑的固有位置,浮動視圖的位置和大小等。這意味著除非進行了重大更改(形狀縮放,對象移除等),否則下一次模擬運行將以與上一次相同的方式執行。此項目將忽略一些次要設置。
Remove new objects: when selected, then scene objects added during a simulation run will be removed at the end of the simulation.
刪除新對象:選中後,在模擬運行期間添加的場景對象將在模擬結束時被刪除。
CoppeliaSim <<
Previous Next >> line following bubblerob